Show me the samid and upn name of all disabled user accounts in the domain.
C:\>dsquery user -disabled | dsget user -samid -upn
Show me the samid and upn of each user account in the domain and show me when the user account expires.
C:\>dsquery user | dsget user -samid -upn -acctexpires
Show me the samid and upn of each user account in the domain and show me when the user account expires. Send output to a file called c:\log.txt
C:\>dsquery user | dsget user -samid -upn -acctexpires > c:\log.txt
Show me the samid and upn name of each user account in the Production OU in the TEST.COM domain with a password age of 14 days or older and also show me if the account is flagged for "user must change password" and if the user account is allowed to change its password
C:\>dsquery user "OU=Production,DC=test,DC=com" -stalepwd 14 | dsget user -samid -upn -mustchpwd -canchpwd
Friday, December 31, 2010

Wednesday, December 29, 2010
Restoring objects with Microsoft ADRestore (previously Sysinternals)
Formerly Sysinternals and now Microsoft, Mark Russinovich has created a command-line freeware application called ADRestore. The tool enumerates all of the currently tombstoned objects in a domain and allows you to restore them selectively, and provides a convenient command-line interface for using the Active Directory reanimation functionality. If you run it from the command line you will be prompted to choose which object you want to restore, and since there could be quite a few tombstoned objects, this process might take some time as you answer NO to each and every prompt.
To add a little selectivity to the restore operation, you can run ADRestore with a parameter to narrow down the search. For example:
adrestore -r daniel
would search for all objects with "daniel" as part of its name.
The -r switch forces the program to prompt the user for each restoration. Otherwise, all the objects found matching said criteria will be automatically restored. The default (no criteria supplied) is that all tombstoned objects will be enumerated and restored.
Note that deleted items may no longer be members of specific organizational units or OUs. Restoring these objects from deleted status will not automatically restore them to their respective OUs; this will need to be done manually.
Recovering Deleted Items in Active Directory
Restoring objects with ADRestore.net
Guy Teverovsky, a fellow MVP from Israel, has written a cool tool that allows you to easily restore deleted AD objects. The tool is provided as freeware and has no kind of support, but from what I've seen, it works great. Some of the tools features include:
- Browsing the tombstones
- Domain Controller targeting
- Can be used with alternative credentials (convenient if you do not logon to your desktop as Domain Admin, which you should never do anyway)
- User/Computer/OU/Container reanimation
- Preview of tombstone attributes
Enumerating tombstones

Previewing the tombstone attributes
 Restoring a deleted user account

For more information on Guy's tool, please see Guy's blog entry announcing ADRestore.net
Tuesday, December 28, 2010
Windows Server : Managing the Terminal Services - RDP Permissions
Managing the terminal services includes various tasks such as assigning RDP permissions, configuring connection limits, session time limits, assigning session permissions, viewing process, monitoring sessions, logging off users, disconnect sessions, and resetting the terminal services. Terminal Services Manager is used to perform these administrative tasks. Ensure you have a thorough understanding of every task and the implications before you apply it on a production network. Improper configuration of permissions may result in assigning additional permissions to the users where not required and inadequate access where required.


RDP Permissions
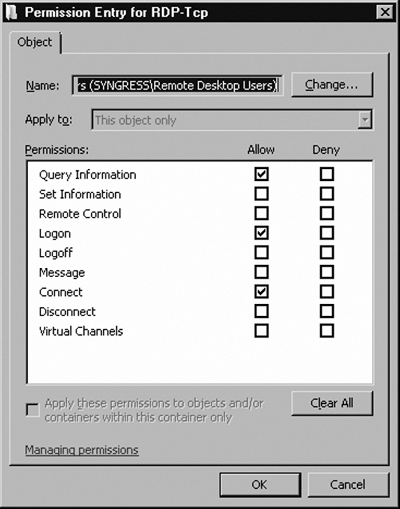
Terminal Services Manager allows you to configure various RDP permissions. Permission sets such as Full Control, User Access, Guest Access, and Special Permissions can be assigned to users, clients, and groups. Each permission set has one or more permissions (see Tables 1 and 23). Figure 1 shows the RDP properties. Figure 2 shows the advanced security settings for RDP. Figure 3 shows RDP permissions.
| Permission[*] | Description |
|---|---|
| Full Control | Permission set providing Query Information, Set Information, Remote Control, Logon, Logoff, Message, Connect, Disconnect and Virtual Channels permissions |
| User Access | Permission set providing Query Information, Logon, and Connect permissions |
| Guest Access | Logon permission only |
| Logon | Logon to Terminal Server session |
Figure 1. RDP Properties




Saturday, December 11, 2010
windows xp service pack 3 access denied error
Procedure to follow
1) Download and then install the Subinacl.exe file from the following link
http://www.microsoft.com/downloads/en/details.aspx?FamilyID=e8ba3e56-d8fe-4a91-93cf-ed6985e3927b&displaylang=en
2) Start Notepad
Copy and then paste the following text into Notepad.
cd /d "%ProgramFiles%\Windows Resource Kits\Tools"
subinacl /subkeyreg HKEY_LOCAL_MACHINE /grant=administrators=f /grant=system=f
subinacl /subkeyreg HKEY_CURRENT_USER /grant=administrators=f /grant=system=f
subinacl /subkeyreg HKEY_CLASSES_ROOT /grant=administrators=f /grant=system=f
subinacl /subdirectories %SystemDrive% /grant=administrators=f /grant=system=f
subinacl /subdirectories %windir%\*.* /grant=administrators=f /grant=system=f
secedit /configure /cfg %windir%\repair\secsetup.inf /db secsetup.sdb /verbose
3) Save this file as sp3fix.bat
Double-click the sp3fix.bat file
to run the script.
Note This script file may take a long time to run. You must run this script as an administrator.
1) Download and then install the Subinacl.exe file from the following link
http://www.microsoft.com/downloads/en/details.aspx?FamilyID=e8ba3e56-d8fe-4a91-93cf-ed6985e3927b&displaylang=en
2) Start Notepad
Copy and then paste the following text into Notepad.
cd /d "%ProgramFiles%\Windows Resource Kits\Tools"
subinacl /subkeyreg HKEY_LOCAL_MACHINE /grant=administrators=f /grant=system=f
subinacl /subkeyreg HKEY_CURRENT_USER /grant=administrators=f /grant=system=f
subinacl /subkeyreg HKEY_CLASSES_ROOT /grant=administrators=f /grant=system=f
subinacl /subdirectories %SystemDrive% /grant=administrators=f /grant=system=f
subinacl /subdirectories %windir%\*.* /grant=administrators=f /grant=system=f
secedit /configure /cfg %windir%\repair\secsetup.inf /db secsetup.sdb /verbose
3) Save this file as sp3fix.bat
Double-click the sp3fix.bat file
to run the script.
Note This script file may take a long time to run. You must run this script as an administrator.
Tuesday, October 12, 2010
Microsoft DOS route command
Route
Command to manually configure the routes in the routing table.
Availability
The route.exe command is an external command that is available in the below Microsoft operating systems.
Windows 95
Windows 98
Windows ME
Windows 2000
Windows XP
Windows Vista
Windows 7
Syntax
ROUTE [-f] [-p] [command [destination] [MASK netmask] [gateway] [METRIC metric] [IF interface]
| -f | Clears the routing tables of all gateway entries. If this is used in conjunction with one of the commands, the tables are cleared prior to running the command. | |||||
| -p | When used with the ADD command, makes a route persistent across boots of the system. By default, routes are not preserved when the system is restarted. When used with the PRINT command, displays the list of registered persistent routes. Ignored for all other commands, which always affect the appropriate persistent routes. This option is not supported Windows'95. command | |||||
| command | One of these: PRINT Prints a route | |||||
| destination | Specifies the host. | |||||
| MASK | Specifies that the next parameter is the 'netmask' value. | |||||
| netmask | Specifies a subnet mask value for this route entry. If not specified, it defaults to 255.255.255.255. | |||||
| gateway | Specifies gateway. | |||||
| interface | the interface number for the specified route. ll symbolic names used for destination are looked up in the network database file NETWORKS. The symbolic names for gateway are looked up in the host name database file HOSTS. If the command is PRINT or DELETE. Destination or gateway can be a wildcard, (wildcard is specified as a star '*'), or the gateway argument may be omitted. If Dest contains a * or ?, it is treated as a shell pattern, and only matching destination routes are printed. The '*' matches any string, and '?' matches any one char. Examples: 157.*.1, 157.*, 127.*, *224*. Diagnostic Notes: Examples: > route PRINT
If IF is not given, it tries to find the best interface for a given > route PRINT One way to use this would be as follows: You can't ping the server that you are connecting to, but you know the ip address to be 127.16.16.10 >route PRINT Interface List Active Routes: ** notice that no gateway for the current ip goes to 255.255.255.0, so it must be added. Now do the below command. >route ADD 127.16.0.0 MASK 255.255.255.0 **Then do the below command: >route print Active Routes: **Notice the ** ip address gives me the default gateway. |
Friday, August 27, 2010
Configure TCP/IP from the Command Prompt
In order to configure TCP/IP settings such as the IP address, Subnet Mask, Default Gateway, DNS and WINS addresses and many other options you can use Netsh.exe.
Netsh.exe is a command-line scripting utility that allows you to, either locally or remotely, display or modify the network configuration of a computer that is currently running. Netsh.exe also provides a scripting feature that allows you to run a group of commands in batch mode against a specified computer. Netsh.exe can also save a configuration script in a text file for archival purposes or to help you configure other servers.
Netsh.exe is available on Windows 2000, Windows XP and Windows Server 2003.
You can use the Netsh.exe tool to perform the following tasks:
- Configure interfaces
- Configure routing protocols
- Configure filters
- Configure routes
- Configure remote access behavior for Windows-based remote access routers that are running the Routing and Remote Access Server (RRAS) Service
- Display the configuration of a currently running router on any computer
- Use the scripting feature to run a collection of commands in batch mode against a specified router.
What can we do with Netsh.exe?
With Netsh.exe you can easily view your TCP/IP settings. Type the following command in a Command Prompt window (CMD.EXE):
netsh interface ip show config
With Netsh.exe, you can easily configure your computer's IP address and other TCP/IP related settings. For example:
The following command configures the interface named Local Area Connection with the static IP address 192.168.0.100, the subnet mask of 255.255.255.0, and a default gateway of 192.168.0.1:
netsh interface ip set address name="Local Area Connection" static 192.168.0.100 255.255.255.0 192.168.0.1 1
(The above line is one long line, copy paste it as one line)
Netsh.exe can be also useful in certain scenarios such as when you have a portable computer that needs to be relocated between 2 or more office locations, while still maintaining a specific and static IP address configuration. With Netsh.exe, you can easily save and restore the appropriate network configuration.
First, connect your portable computer to location #1, and then manually configure the required settings (such as the IP address, Subnet Mask, Default Gateway, DNS and WINS addresses).
Now, you need to export your current IP settings to a text file. Use the following command:
netsh -c interface dump > c:'location1.txt
When you reach location #2, do the same thing, only keep the new settings to a different file:
netsh -c interface dump > c:'location2.txt
You can go on with any other location you may need, but we'll keep it simple and only use 2 examples.
Now, whenever you need to quickly import your IP settings and change them between location #1 and location #2, just enter the following command in a Command Prompt window (CMD.EXE):
netsh -f c:'location1.txt
or
netsh -f c:'location2.txt
and so on.
You can also use the global EXEC switch instead of -F:
netsh exec c:'location2.txt
Netsh.exe can also be used to configure your NIC to automatically obtain an IP address from a DHCP server:
netsh interface ip set address "Local Area Connection" dhcp
Would you like to configure DNS and WINS addresses from the Command Prompt? You can. See this example for DNS:
netsh interface ip set dns "Local Area Connection" static 192.168.0.200
and this one for WINS:
netsh interface ip set wins "Local Area Connection" static 192.168.0.200
Or, if you want, you can configure your NIC to dynamically obtain it's DNS settings:
netsh interface ip set dns "Local Area Connection" dhcp
BTW, if you want to set a primary and secondary DNS address, add index=1 and index=2 respectively to the lines of Netsh command.
As you now see, Netsh.exe has many features you might find useful, and that goes beyond saying even without looking into the other valuable options that exist in the command.
Subscribe to:
Posts (Atom)